

Learn how to ferment your own authentic homemade sauerkraut in easy to follow steps. It’s easier than you think!
Get out those bier steins and break out the lederhosen because I love sharing the cuisine of my childhood…German Food! There’s nothing tastier than rich Beef Rouladen served with mashed potatoes (or spaetzle) and a side of Braised Red Cabbage (Rotkol).

Want to save this recipe?
Enter your email below and get this post sent straight to your inbox. Plus, I’ll send you my weekly newsletter featuring the newest and best Dish ‘n’ the Kitchen recipes every week!
“Love sauerkraut Bernice, but I’ve never made it myself. It’s on my list of things to try making, and this post is just the motivation I need to give it a try. Thanks for sharing your recipe and tips, and identifying the possible issues I might have!”
Leanne
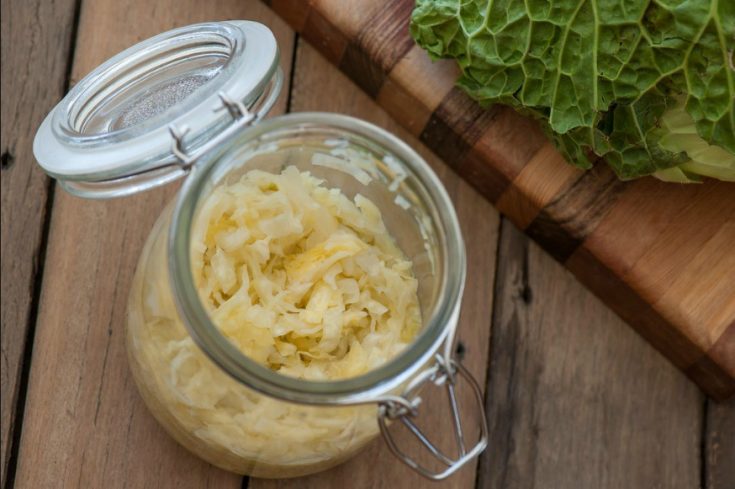
Homemade Sauerkraut
For those who love sauerkraut, this is the standard or traditional style recipe for creating the best fermented cabbage. I love to eat it on its own, on a hotdog, or in sausage sauerkraut soup.
The final product is salty, slightly sweet and oh, so funky. The cabbage has softened slightly but is not fermented to the point of mush. Best of all, each forkful contains healthy live probiotic bacteria, vitamins, and minerals. You might as well refer to sauerkraut as THE ‘German Superfood’!
Lactic Fermentation
Sauerkraut is the result of Lactic Fermentation. During this anaerobic process, sugars and starches in the cabbage are broken down by Leuconostoc bacteria.
These bacteria are naturally present and harmless. Their job is to convert the sugars in the cabbage to produce lactic acid and carbon dioxide.
As the acid level rises, other microorganisms are killed leaving small amounts of simple alcohols and hydrocarbons to form.
These alcohols and hydrocarbons then form chemical compounds called esters which give the sauerkraut it’s characteristic flavour. You can use lacto-fermentation on almost any vegetable too, why not give this Fermented Cauliflower a try next?!

What You Need to Make Sauerkraut
To ferment the most basic style of sauerkraut all you need is cabbage, salt and time. Once you know the ratio of salt to cabbage and the basic principles behind fermentation, this fermented treat practically makes itself.
Probably the most important tool you need to make homemade sauerkraut is a fermentation vessel. All you need is a small crock or a quart jar with a lid.
What I use is a quart jar fitted with an airlock. An airlock prevents air from getting into the jar but allows the gases formed during fermentation to escape.

How to Make Your Own Fermentation Vessel
To make your own fermentation vessel you will need a glass quart jar with a plastic lid, a rubber grommet and an airlock. You can buy an airlock at any brewing store and source the rubber grommets on Amazon.
Measure the bottom ‘straw’ part of the airlock, then drill an appropriate sized hole in a plastic quart jar lid. Fit the grommet on the airlock, then insert it into the hole. Add water and watch it bubble away as the fermentation gasses escape.
How to Make Sauerkraut
While the recipe ingredients are simple, the method takes a little practice, time, and patience. Once you get the hang of it, you’ll be fermenting batch after batch of this popular German side dish.

Prepare the cabbage by removing any limp outer leaves. Slice it in half through the stem and remove the core. Slice each half in half a second time. You can use a food processor here, however I prefer to slice my cabbage by hand so I can control the size better.
Try to keep the sliced cabbage a uniform size as you slice and remove any of the thicker pieces. Save them for soup or discard.
Weigh the cabbage on a kitchen scale as you go. If you are using a quart jar as a vessel, 1 kg of sliced cabbage is a good amount to start with. This is because for every 1 kg of sliced cabbage, you will need to add 4 tsp of salt.
The kind of salt you use for fermentation is very important. Use a natural salt such as Himalayan, Sel Gris, or kosher salt which does not have any added iodine or anti-coagulants. Both will impede the fermentation process.
Massage the salt and cabbage together. You will begin to notice how the cabbage softens as the cell walls break down. Depending on the water content of the cabbage this could take 5-20 minutes.
Fresh crop cabbage will release quite a bit of moisture as you massage while older cabbage will release less. When the cabbage has softened, pack it tightly into a sterilized jar or crock and pour the brine over all. Press the cabbage down so that it is submerged under the brine.

If you absolutely do not have enough brine, do not panic! Add a 2.5% salt and water brine (1/2 tsp salt/1 cup water) OR top it up with any kind of wine. Allow to ferment at least one week and up to 3 weeks. Refrigerate.
Tips for Great Homemade Sauerkraut
There are 3 golden rules to follow when fermenting your own kraut:
- Use the correct salt to cabbage ratio. Using more salt will only make the sauerkraut extra salty, using too little will attract unwanted bacteria.
- Keep it submerged under the brine. If you need to, you can do this by hand, just wash your hands and press the cabbage down until it becomes fully submerged.
- Temperature is king. Too cool and your kraut will ferment too slowly, allowing unwanted bacteria or mold. Too warm and you may also have a wealth of issues. A temperature range of 65-70°F (18-21°C) degrees is perfect.

If you follow the above three golden rules your ferment should be happy, right? Well…maybe not. As with any natural process, there are a few things that could go awry.
Preventative measures such as cleaning your equipment and washing hands and vegetables are a great place to start. Use only fresh vegetables, not ones that are moldy or soft. If you are adding high sugar vegetables, like carrots, add them in small quantities.
Health Benefits of Sauerkraut
Homemade Sauerkraut is a nutritional powerhouse! It has the benefits of eating raw cabbage (low in calories but packed with Vitamins K and C) while also delivering healthy probiotics to your gut.
Probiotics aid in the absorption of Vitamins and generally aid in digestion. Other Vitamins and Minerals present in Sauerkraut are: Vitamin B6, Iron, Manganese, Folate, Copper and Potassium.
However, kraut is quite high in sodium, so it is not recommended for low sodium diets or people watching their salt intake.
Homemade vs. Store Bought
Homemade kraut contains live probiotics. It is best to store it in the fridge after the initial fermentation to slow the bacteria down. If you intend to store your sauerkraut for a longer period of time, consider freezing it.

Yes, you can buy jars of processed sauerkraut from the grocery store but the high processing temperature kills off the beneficial probiotics. Processed kraut still contains all the Vitamins and minerals but will be less beneficial in the long run.
If you would rather buy sauerkraut, source it from the refrigerated section of your grocery or health food store, not the dry goods aisle.
Sauerkraut Troubleshooting Guide
We’ve all been there, don’t worry. There are very few things can go horribly wrong with sauerkraut.
That said, under certain conditions a flat, thin, white to cream-colored powder yeast (called KAHM) may form on the surface. It won’t hurt you but it does affect the flavour of your kraut. Since it’s difficult to get rid of, just discard your batch and start anew.
Does your sauerkraut have a thin mold growing on the surface? This may mean that the fermentation was not vigorous enough during the early stages.
If the mold is green or grey, you can safely skim it off and keep on fermenting. Of course, if you feel more comfortable tossing it, go right ahead. Don’t give up, great kraut is worth it!
If you see black, pink or orange mold, or it smells rotten discard it and start again (source).

Sauerkraut Variations
As the recipe suggests, there are many ways to add some extra flavours into your homemade sauerkraut. All of these make great additions to any sauerkraut ferment.
- Fresh dill
- Shredded carrot with ginger
- Cabbage with caraway
- Brussels Sprouts
- Red Cabbage instead of green cabbage.
- Beet and Ginger
- Fennel
- Apple
To add in other vegetables, be sure to chop them into a size similar to your cabbage, otherwise fermentation issues may occur.

Can Homemade Sauerkraut Go Bad?
Absolutely. Sauerkraut does have a shelf life. After fermentation is complete I keep mine in the fridge for up to 3 months.
The best way to tell if your sauerkraut is bad is to give it the old sniff test. As with any fermented or preserved food, if it smells exceptionally foul, has changed colour, or appears moldy, toss it.

Authentic Homemade Sauerkraut
Learn how to ferment your own authentic homemade sauerkraut in easy to follow steps. It's easier than you think!
Ingredients
- 1 medium green or red cabbage 2.5 lbs. (about 1 kg) You can also add a mix of chopped veggies to the cabbage; say 1/2 kg cabbage to 1/2 kg veggies such as carrots, turnips, beets, Brussels sprouts, and even apples.
- 4 tsp salt (non iodized)
- OPTIONAL: caraway seeds, celery seed, grated ginger, fresh dill
Instructions
- Discard outer limp cabbage leaves and core cabbage.
- Slice the cabbage into desired size. Try to make it uniform but you can do anything from a round chop to a fine shred. If you have larger, thicker rib slices you may want to discard those for use in another recipe.
- When you have 1 kg of cut cabbage in the bowl, sprinkle the salt over top and begin massaging the cabbage.
- Keep rubbing until the cabbage is quite soft and pliable and there's at least 1 cup brine in the bottom of the bowl. Depending on the water content of the cabbage this could take 5-20 minutes.
- Add in flavour option (s) if using.
- Pack the cabbage tightly into a jar or crock and pour the brine over all. Press the cabbage down so that it is submerged under the brine.
- If you absolutely do not have enough brine, do not panic! Add a 2.5% salt and water brine (1/2 tsp salt/1 cup water) OR top it up with any kind of wine.
- Allow to ferment at least one week and up to 3 weeks. Refrigerate.
Nutrition Information:
Yield:
10Serving Size:
1Amount Per Serving: Calories: 62Total Fat: 0gSaturated Fat: 0gTrans Fat: 0gUnsaturated Fat: 0gCholesterol: 0mgSodium: 971mgCarbohydrates: 14gFiber: 5gSugar: 7gProtein: 3g
Nutritional calculation was provided by Nutritionix and is an estimation only. For special diets or medical issues please use your preferred calculator.


Hello, I am just wondering do you have to refrigerate if unopened or can it be shelved until ready to eat and then refrigerated?
Looking to make ahead for a Bazaar.
Thank you,
Lisa
HI Lisa. If it’s left at room temperature, it will continue fermenting. I would sell in plastic containers because if you seal them in glass jars, there’s the possibility of explosion. Direct your customers to refrigerate when they bring it home.
Refrigeration will slow the fermentation. That’s why you see commercial ‘live’ cultured sauerkraut in the chilled section of stores.
Can you freeze the sauerkraut without destroying the benefits?
Yes, if you need to extend the lifespan of your kraut it’s better to freeze it than to can it. The sub zero temps will only send the probiotics into hiberation. The only thing that may be an issue is texture once it’s thawed.
Won’t doing the fermentation in a sealed glass jar possibly cause the jar to burst from the buildup of gases?
It could. That’s why I describe how to make a lid with an airlock. I use a variety of containers for my ferments, including a specialized fermentation crock and the jars with airlocks. I have also fermented in a jar with a screw on/flip top lid. It’s fine if you ‘burp’ it every few days. Once your ferment is finished, you can store it in a regular jar in the fridge.
Love sauerkraut Bernice, but I’ve never made it myself. It’s on my list of things to try making, and this post is just the motivation I need to give it a try. Thanks for sharing your recipe and tips, and identifying the possible issues I might have!
GREAT! Once you start, you’ll wonder why you ever bought it!
I eat a spoon of sauerkraut almost every day (and I have since high school!) because it makes me feel so good, and my skin especially appreciates it. I learned so much here. I’ve never tried to make it myself, and I often switch back and forth between the kind from the fridge section vs the dry goods aisles. I feel so much more informed!
Really? I’ve never heard of that…is it like a drinking apple cider daily kind of thing? Definitely cheaper to make your own but the fresh, cold stored stuff is the next best thing.
Fermentation scares me (unless I’m baking bread with yeast). I love how encouraging you are though I will know now to look for sauerkraut in the refrigerated section for store bought.
Awesome…you’re halfway there! It is REALLY easy and difficult to screw up. I get my son to make some most of the time.
Thanks for sharing this sauerkraut recipe, Bernice. I have been really getting into fermentation lately, and having been looking forward to trying sauerkraut. Your post makes it seem much less intimidating!
That is SO great to hear Colleen. I hope you do try it. In addition to it being really good for you, homemade sauerkraut is SO much cheaper than if you were to buy the live version in the grocery store.